
How to make marketing videos: Full production Guide from beginner to advanced
- György
- December 9, 2021
- Video
Tips for shooting business and marketing videos
A guide to improving your video production workflow for in-house marketing video shoots
This guide is aimed at beginning and intermediate videographers shooting business and marketing videos. As it is very long (which no one likes or reads), I broke it up into three parts.
First: I’ll explain a bit more in detail who my target audience is.
Second: I’ll list the key video production topics and give you a very brief overview.
Third: I’ll elaborate on each of them and you’ll be able to skip what you’re not interested in and jump ahead to what’s relevant to you.
So that you know what’s in store, here is a map of they key video production topics we’ll be discussing.

Click on the links below to jump to the section you’re interested in.
1. Introduction
Fact: Whether you’re a small business owner working on your video marketing strategy or an expert developing YouTube video marketing services for other businesses, you’re under enormous pressure to produce polished, well-structured, high-quality video content.
It’s 2022. Everyone seems to be relying on business videos and so must you.
Production costs seem dauntingly high and you’ve decided to shoot your marketing and branding videos in-house. You have come up with a social media strategy that utilises the power of videos.
And then you realise that your expertise lies elsewhere. After all, you’re running a real estate business, an e-commerce company, a yoga studio, a bakery or a bike repair shop and not a video production company for a reason.
Anxiety sets in. You’re flooded by technical questions. Will your iPhone be good enough? Or should you invest in a “proper” camera? DSLR or mirrorless? Can you shoot your videos at home? How do you record high-quality sound? What about working outdoors or in low light? Should you use a tripod or a gimbal? And what about editing, how long is that going to take?
Don’t Panic! (Famous and wise words.)
As a cinematographer talking to and training many of you, I have come to know the intimidation and anxiety this pressure can produce. My expertise is in shooting videos and not marketing, so in this article I will offer you advice about improving your video creation skills instead of fumbling with social media marketing insights.
Let me try to help you with the following guide. It should immediately make your videos more organised, manageable and less stressful.
Most importantly: don’t let the perfect be the enemy of the good. It’s an incremental process. You don’t have to get everything right immediately. Just make sure that each consecutive marketing or branding video is somewhat better than the previous one.
The impact of your videos will grow parallel to your videography skills.
Before the shoot - Pre-production
Pre-production is all about optimising your limited resources and saving time during the shoot. The rarest resource on every project is time itself. Careful attention in prep ensures that you’ll get all your footage on the day of the shoot and that you’ll be able to stay within your budget and delivery deadlines.
know your audience
Like with any other creative process, know who you are targeting with your video. Know in advance if they are more likely to engage with a 1-2 minute video, a 30-second ad or a 5+ minute explainer video. The duration and the call to action of the video will determine the length and number of shots that you need. Everything else you need to do stems from these two simple facts.
know your location
Learn all you can about your locations before the shoot. There are 3 types of locations.
1. Studio
First, you might be shooting in a studio. It can be in your basement, your living room, a large conference room or a dedicated video studio space. The purpose of a studio is to provide you with a location that you can fully control. Lighting, sound recording, camera placement can be precisely planned and fine-tuned. Having a studio is a great asset if you are producing lots of videos of a similar kind: product presentations, interviews, vlogs.
2. On-location indoors
Second, you’re on-location indoors. You might shoot in someone’s office, warehouse, on a commercial or industrial property. You can make your life a lot less stressful if you see the location before the shoot. If you can’t visit it, ask the people who work there to take pictures on their phones.
Location photos have very specific purposes. They will give you great clues about the size of the location, which in turn will allow you to plan your camera placement, shooting angles and the lenses you will need. They allow you to estimate your distance from your subject during an interview. You can select the most attractive camera angles.
Location stills also inform you about available light, how bright or dark certain areas will be. Look out for windows and artificial light sources. Are the windows large or small? Are they facing North or South? Will you have enough available light to work with? Do you see any artificial light sources that can help you? Ceiling lights? Table lamps?
3. Outdoors
Third, you may need to shoot outdoors. Exterior shoots present video productions with the highest number of unpredictable variables. Try to get ready for as many of them as you can.
Check all your weather forecast apps. Is it going to be sunny or overcast? Do you need to prepare for wind or for rain? If you don’t know the location, find pictures and check out aerial or street views on online maps. With an outdoor shoot you often need to work by a process of elimination: know the directions that you don’t want to shoot in, know the conditions that you’re really not ready for.
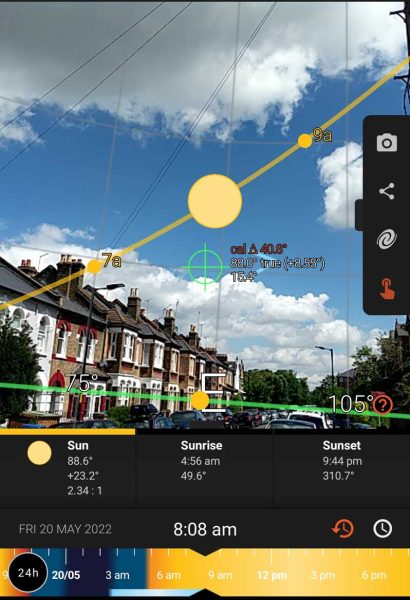
If you’re visiting a potential outdoor location, you can use apps that will show you where the Sun will be on a given day, at a given hour. It’s amazing help when you’re planning a sunrise or sunset shot or need to know if the Sun might be blocked by a building at a given time.
Screenshot of Sun Surveyor showing future location of the sun
know your cast
Depending on your video, you will have a number of participants in front of the camera: presenters, models, actors or your very self.
Prep your cast before the shoot and do everything you can to reduce their (or your) anxiety. Being on camera is not an easy task. Before the shoot you can help your cast by supplying them with as much background information as possible. If you have a shooting script, share it with them.
During the shoot help them to let go. Tell them that it’s perfectly fine to make mistakes. Assure them that it’s okay to hold pauses when they speak. Before you roll, encourage them to relax their postures, shoulders and take a few deep breaths.
It’s also very important for the person behind the camera to relax. If you’re experiencing technical issues with your camera, lights or sound gear, stay calm, smile and don’t let the cast know that you’re desperately trying to figure out what’s wrong.
know your content
You have to know precisely the shots that you need to get. Video production is a creative business which means that things will often not go according to plan. But that is exactly why you must have a plan! Improvising, finding alternative solutions will only work if you have a plan to start with.
A scripted shoot will be different from a run-and-gun style production. The level of precision that you need for planning ahead varies to a great extent. For an ad you might create a shot-by-shot storyboard or a shooting script. For an improvised setup you may be okay with a basic shot list and keeping in mind the b-roll that you need to get.
The reason for all the time you will spend in pre-production is that you don’t want to miss important shots. The content that you fail to create on the day of the shoot is usually very expensive and/or time-consuming to recreate later.
know your gear
Creating a simple checklist is a great tool for making sure that you don’t forget small but essential parts of your gear at home. It also gets you in the habit of thinking before your shoot about the gear that you will actually need.
Will you be shooting on a smartphone, a mirrorless system or a professional camera? How many lenses will you need? Have you got all your batteries, chargers, data and power cables? Did you pack a grey card? If you’re shooting outdoors do you have a rain cover for your equipment and a lens cleaning kit for wiping your lenses and filters clean?
during the shoot - production
Always be a perfectionist – but also learn to appreciate what’s good enough. What do I mean? Be very critical of your own work. An uneven camera pan or shaky handheld video (unless that’s your creative goal) is easy to repeat during the shoot.
If you’re recording an interview and someone’s phone rings, it’s easier and faster to re-record the last question and answer then to hope that “no one will notice it”.
Don’t ignore small mistakes. They will start piling up and your “let’s fix it later” type post-production tasks will always increase your production costs.
On the other hand learn to appreciate shots that are perhaps not amazing, but are still well-executed and decent takes. Between your “good enough” and “unacceptable” shots there will always be professional red lines that will change with your growing skill set and experience.
the shot list
1. Prepare a shot list
Professional video production is not merely about the individual shots. Like being a composer, you’re creating a complex structure of shots with a specific internal rhythm and flow. Having a shot list is the minimum requirement for anything, but the simplest of shoots.
2. Angles and shot sizes
It’s essential to show content from diverse angles and vary your shot sizes. The essence of any shot is directing your audience’s attention. A wide shot allows the viewer to place the subject of the shot in its context. A close-up, on the other hand, focuses attention on just the subject of the shot.
Plan your opening and closing shots. Are they going to be wide shots?
Always think about B-roll. These are shots that are perhaps less essential to your story (although every shot is important) but allow you to adjust the pace of your story in editing. Imagine a product demo. Your presenter is talking for a few minutes about a new coffee maker. You would need a number of shots of the coffee maker being filled with beans or ground coffee, buttons pressed, black coffee trickling into a cup, milk being steamed. These shots would allow you to shorten the presenter’s audio track if necessary.
the location
Do everything you can to control your location. That starts with determining the ideal time for shooting on a given location and doing your best to schedule your production accordingly.
Once you’re on location, pay close attention to staging. Clean the shot of disturbing visual elements. Get rid of clutter. Manage visual and auditory distractions, like a TV running in the background or music playing on someone’s speakers.
Sometimes you might feel like you’re a nuisance asking people to reorganise their offices or turning off a loud air conditioning unit. Just remind yourself the primary reason why you are shooting videos: visuals are stronger than long paragraphs.
The images and the sound you record are the message the audience will hear.
composition
Here are a few ideas that will help you especially with interviews.
Vertical spacing: leave your subject enough but not too much head room.
Horizontal spacing: putting your subject in the middle of the frame is not “wrong” but produces an extremely static image. It’s also closely connected to the speaker’s looking angle. A presenter looking straight into the camera (i.e. at the viewer) is usually placed centrally. Cast looking off-camera should typically be placed off-center, leaving more space in the frame in the direction of the subject’s gaze.
Think about your compositions spatially, too. Putting your subject straight against the background (wall, window, bookshelf) produces a flat image. Separating the subject from the background produces a more three-dimensional scene, where you will also be able to keep the background more under control relying on depth-of-field.
Examples of framing a talking head

lighting
There are many principles to lighting but it all starts making sense when you realise the main goal of any composition: to skilfully direct your viewers’ attention.
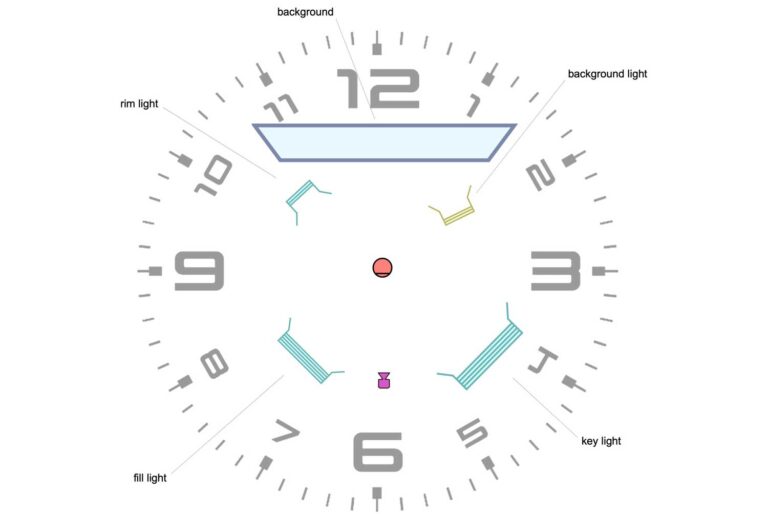
There are four main constituents to any lighting setups.
- Quantity: how much light are you working with? For videography both too much light and too little present challenges. With artificial light sources always keep in mind that the level illumination decreases exponentially with distance.
- Quality: light can be directional producing hard shadows and diffused with soft shadows. And anything in-between. Even when you’re producing your own lighting setups it’s worth thinking about the two main natural light sources on planet Earth: the Sun (direct) and the sky (diffuse).
- Direction: there are many styles of lighting, but they all can be understood and analysed in terms of placing sources at angle horizontally and vertically.
- Colour: when using multiple sources, understanding white balance is essential for getting good results. As a videographer you also need to think about consistency of colour throughout your shots and most importantly, skin tone reproduction.
Example of a 3-point lighting plan
sound
Sound can be more important than images for certain genres. A testimonial, a presentation or an interview where the subject’s voice is not clear will be a fail.
On any location identify sources of noise and see if you can control them. Some of these are continuous (like a fridge, an AC unit, traffic or rain), some of them are intermittent (doors, bells, ambulance sirens, live radio, laughter and crying).
Continuous noises are easier to address in post, intermittent ones can cause real headaches especially with continuity.
Noticing background noise and soundscapes takes a surprising amount of effort as the human brain usually filters these out.
do's and don'ts
- Avoid unwanted camera shake. Unless you know what you’re doing you’ll be better off shooting from a tripod or a well-balanced gimbal than handheld.
- Always make sure that your footage is sharp. Digital cameras are quite flexible with exposure but what’s out of focus, stays out of focus.
- Avoid overexposure. The nature of the digital signal means that once it reaches its maximum, no more information can be preserved. That means white without structure, texture or detail. If it’s a tiny part of your composition, like a small highlight on some metal or glass, it doesn’t really matter. But if it’s a substantial area (a large portion of the sky, bright clothing or skin) it’s distracting and disturbing.
- Avoid white backgrounds in interviews. A white background will make it difficult for you to separate the talent from it with lighting and can be distracting.
- A more detailed shooting workflow guide can be found here.
after the shoot - post-production
editing software
What kind of software you go for will depend on your needs and the level of your interest in editing. But for the simplest of videos that are posted online minutes after their creation, editing is a highly creative and technical part of the filmmaking workflow.
For those who wish to produce fast results, Screenflow, Camtasia, Adobe Rush or iMovie might be good solutions.
For those who need to have more control over the final output, DaVinci Resolve (free!), Adobe Premiere Pro of Final Cut X could be ideal solutions.
organise your media
Media management is key. Please do not ever underestimate it.
Your digital media assets represent the total sum of your financial and time investment! Losing them or simply not being able to locate them is indeed a tangible financial loss.
Assets mean a lot more than just your primary footage: logos, stills, music, sound effects are all part of it.
Organisation of your media needs to happen on two levels: outside your editing software, on your computer’s internal hard drive and on multiple external drives. This can be done manually by developing a system of clearly labelled directories and sub-folders.
Organisation of assets also happens inside the editing software usually by using Bins. Today’s NLEs will also help you to use assets across several projects (e.g. an animated logo).
DAM (Digital Asset Management) becomes even more crucial if you need to collaborate with others and outsource some or all of your editing. There are dedicated DAM sites and software and some NLEs (e.g. version 18 of DaVinci Resolve) also incorporate tools for it.
editing workflow
Editing is about rhythm & pace – find it. Don’t be afraid to experiment.
- Organise your media outside your NLE first and then within the NLE.
- Do a rough assembly first. Don’t get lost in details. Look for the best way of telling the story. Don’t be afraid to rearrange and delete shots. Many if not most films are made in the editing suite in spite of all the careful planning that went into their production.
- Start fine-tuning your edit once the first assembly cut is done. Improve the timing of the video and don’t overdo transitions and effects!
- Work on the audio of the video, control levels, transitions and relative volumes if you’re using more than one source (e.g. narration with music).
- Do not skip colour correction and grading. It doesn’t need to be extremely complicated, but footage coming straight from the camera is seldom optimal. You can always make it look better!
exporting your video
Think in advance about the image aspect ratio of your video.
You might need to export more than one format – e.g. horizontal landscape orientation for YouTube videos and vertical, portrait orientation for Instagram stories.
Good NLEs allow you to do this with relative ease, but you may need different versions of your video for different media.
time-saving tips
- The biggest time-saving tool is organising your media assets!
- Think about segments of the video that can be repurposed for other videos.
- Shorter is always better.
- Let the editing inform your next shoot. Learn from your mistakes: not everything can be fixed in post. Or it can be, but it’s extremely time-consuming and therefore expensive.
DO YOU NEED TRAINING OR ADVICE IN business and social media marketing VIDEOGRAPHY?
I haven’t mentioned one aspect of business videos: education. I hope that what you’ve read above answered some of the questions you had before you started reading, and for now you may know the basics about how to make marketing videos.
If you’d like to learn more, I’m here for you. I will do my best to help you achieve your videography goals. For certain topics a few hours of online consultations is incredibly efficient even without a pandemic — especially if we are not in the same city.
We can also do short, regular (weekly, monthly) mentoring sessions. And, of course, we can organise an in-person field day of shooting together. If you have any questions or comments please do not hesitate to write or call any time!


