
Real Estate Videography: Complete Guide from beginner to advanced
- György
- August 10, 2021
- Video
How to shoot real estate videos and virtual tours
Who needs to shoot real estate videos?
Everyone selling or buying real estate needs videos.
If you run a real estate business you need to create high quality virtual tours and property showcases for marketing. Real estate videography is a new skill that you need to master to keep up with the market and increase your sales.
If you are a videographer you might want to offer your services to real estate agents. In that case you need to learn about the specific requirements of real estate videos and start building a portfolio today.
This article is aimed at helping both these types of creators. In case you’d like to jump ahead to the section most relevant to you, click on sections in the table of contents below.
Why invest in video marketing?
Video marketing is no longer the future. It’s here. This means that your investment in video gear and learning how to use it is a solid business decision with a short-term, high ROI. The numbers speak for themselves. According to a February 2021 survey:
Video use in property marketing has become even more important during 2020 and 2021 as travel and social distancing regulations make ‘normal’ viewing very difficult.
Video marketing is no longer the future. It’s here. This means that your investment in video gear and learning how to use it is a solid business decision with a short-term, high ROI. The numbers speak for themselves. According to a February 2021 survey:
Video use in property marketing has become even more important during 2020 and 2021 as travel and social distancing regulations make ‘normal’ viewing very difficult.
How to land a gig - advice to shooters
1. concentrate on high-end properties
The sale of luxury properties can more readily justify the cost of outsourcing video production to a professional. Your daily rates will always be on a case-by-case basis, but the sale of a £2m detached house allows budgeting £2,000 for a virtual tour more than a £170k studio flat.
2. Build a convincing demo reel
You will be judged by the quality of your work. Build a portfolio that clearly demonstrates your shooting and editing skills. If you’re just starting out I’d recommend two approaches. As with all kinds of subject matters, much is a question of access.
If you have access to a nice property, use it. It doesn’t need to be a £10 million mansion! Any property will allow you to demonstrate your understanding of composition and camera movements, your ability to work with natural and artificial light, and your know-how in editing and grading. A reel of compact, engaging, 3-minute real estate videos complete with professional grade graphics, titles, music and voiceover is your calling card.
If you do not have access to such a property, approach a real estate agent who is in need of video marketing and offer your services at a reduced price in exchange for access. Do a great job and they may even become your clients later on. How to find them? Look for agents by looking at “For Sale” signs in luxury neighbourhoods and do the same online.
3. Know what your client’s business needs
Most businesses in need of marketing videos need you to be flexible and fast. As we know, nothing is urgent until it is. A property is suddenly available for shooting the next day: that gig will go to the videographer who can go and shoot it. And then be able to deliver a draft edit within 24 hours and possibly a final version within 48 hours.
Practise. All the time. The next sections discuss numerous skills that you need to perfect so that when you do land a gig, your performance could be convincing.
10 tips for Planning the shoot in real estate videography
Real estate videography is no different from any other kind of video production. The more prepared you come to a job, the better your results will be.
1. Learn all you can about the property
Learn as much about the property before the shoot as possible. What are its best and unique features? Are there any areas that you should highlight? How large is the property? How long will it take you to shoot?
Make a shot list of footage that you need. If you’re a less experienced videographer, it’s easy to forget shots in the heat of the moment. Also, don’t forget to add the number of exterior shots to your interior ones.
Having an estimate of the number of shots will allow you to budget your time efficiently.
2. get a floor plan
Try to get a floor plan – familiarise yourself with the layout in advance. See areas of interest and try to estimate the number of shots you’ll need. A property walkthrough is unlikely to need more than 2 or 3 shots per room — and often a single shot will do the job perfectly well.
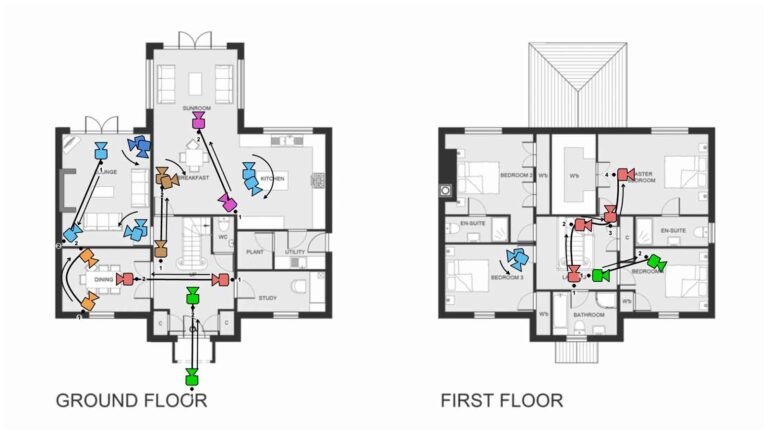
A simple floor plan goes a long way!
This sample shooting plan was prepared in a small but powerful software called shot designer by Hollywood Camera Work. It allows you to draw simple or complex camera moves (and a lot more).
3. ask for photos of the property
These do not need to be professional pictures. The reason behind gathering location photos is using them to find hints about how bright or dark certain rooms will be. How many and what kind of windows does the property have? What areas might have good natural light and where will you need to use the property’s fixtures?
4. use Online maps
Use online maps to find out about the orientation of the property. Whether a garden view from a living room or bedroom window faces East, South or North will influence the kind of light they get at different times of day. This knowledge will help you to get the most out of your time spent at the property: certain areas might be best lit in the morning or around sunset.
5. go on a recce
If you can visit the property before the shoot that’s even better. Naturally, this will make sense for really big real estates and may not feasible when you have to shoot 3 or 4 smaller properties in one day.
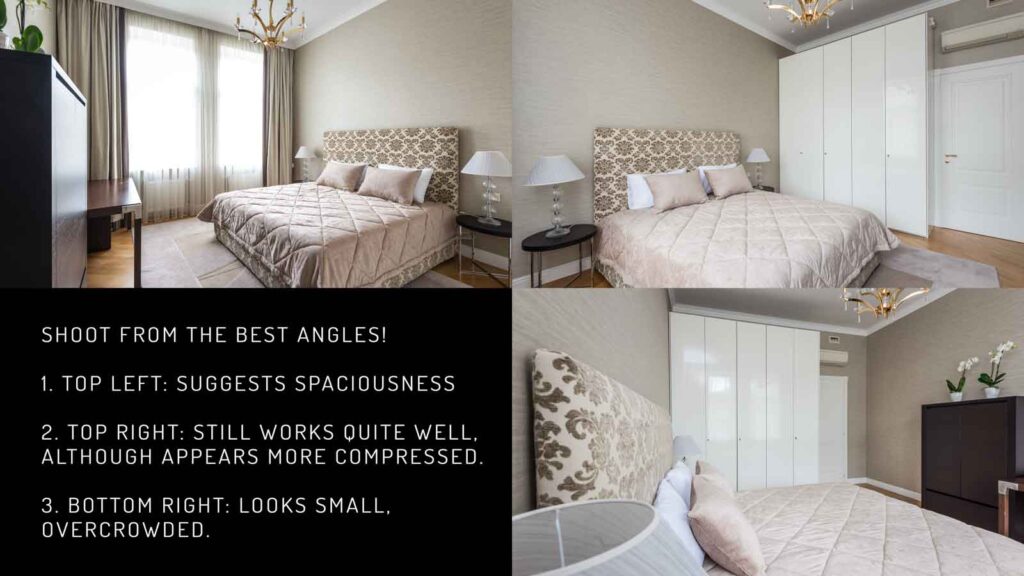
Whether on a recce or on the day of the shoot, look for the best angles. The same space can look strikingly different from different angles.
6. Know where the sun will (might) be
Apps like Sun Surveyor will tell you exactly where and how high the Sun will be on a given day at a given hour at any location. These are incredibly helpful tools for getting the best possible footage. Planning a lovely sunset exterior shot will go a lot better if you know exactly what time the sun will dip beyond a hill, another property or a large tree.
7. Weather apps
Weather apps are your friends, too. An overcast day makes your life in a technical, lighting sense much easier. A bright, sunny day may lift the mood of your exterior shots. Rain and strong wind may prevent you from using your drone. As the quality of your work depends on these variables, any tool that helps you predict these changes is most welcome.
If you can only spend an hour at a property, you can perhaps time your visit better. If you can spend 4 or 5 hours shooting, knowing what you can expect will allow you to introduce a bit of predictability into your planning for the unpredictable.
8. Equipment checklist
You’d be surprised how easy it is to forget essential bits of your gear home. I can’t recommend enough preparing and printing an equipment checklist and going through it before every shoot.
Are all your batteries charged? Do you have enough of them? Did you pack all your filters? Memory cards? Reserve memory cards? Cables and reserve cables? Lens cleaning kit? Rain gear?
9. pre-shoot property check
It may or may not be your task to physically do it, but make sure the property is in its best, most attractive condition. This goes beyond the generic rule of tidying up any place. Pay attention to small details ranging from arranging cushions on a sofa to making sure that if you’re showing a room with three lamps turned on, they all have working light bulbs in them.
Don’t underestimate this task. Having to do tidy things up leads to wasting lots of valuable shooting time. And neglecting will be detrimental to the final video.
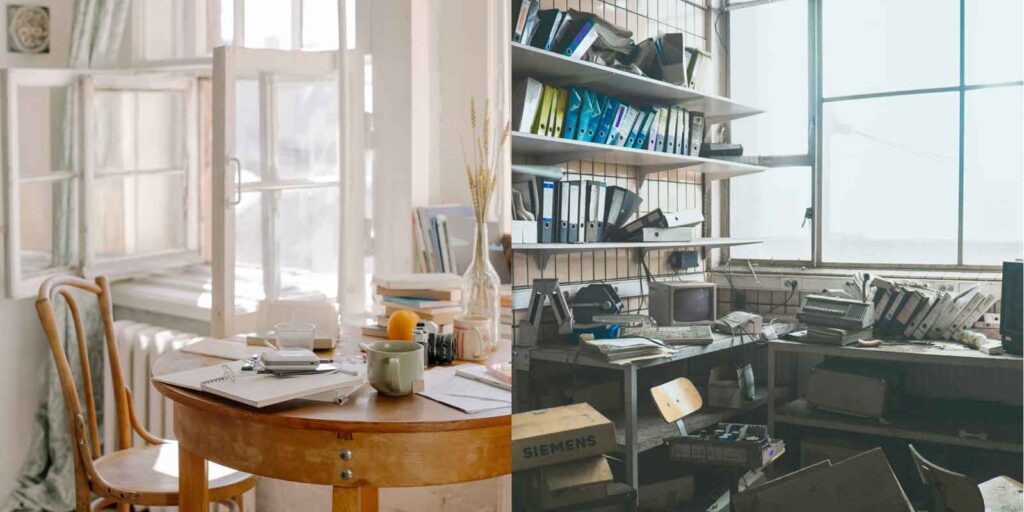
Nope.The real issue with items that don’t belong is that they distract the viewer’s attention from the property.
10. keep track of time
Last but not least, know how long you will have to shoot a given property. Whether you have 90 minutes or 6 hours, plan accordingly and keep track of your progress. All your preliminary research, practising your skills and planning your shoots are crucial for making sure that you can complete your shoots in the time available to you.
choosing you Gear for real estate videos
Let me start with a practical answer that most articles on this topic avoid mentioning: the right gear depends on your budget, the value of the property that you are advertising and the channel you’re advertising it on. Can you shoot good real estate video on your smartphone’s camera and a £130 gimbal? Yes, you can. Will you be able to shoot higher quality videos on a full frame mirrorless camera with a very sharp wide-angle zoom lens? Of course.
As a practising professional I always encourage my clients and students to aim for the sky and produce the highest quality videos. However, I am also very much aware of the two real life constraints that limit all of us: the budgets we are given and the time we have for any given production.
If you are a busy realtor or videographer who needs to shoot 3 homes in a day and deliver walkthrough videos in 2 days your workflow will be very different from someone shooting a single, luxury property with a day for the recce, 4-6 hours for shooting and 2-3 full days for post-producing the video.
That being said, the most important pieces of gear to consider for real estate videography are: the camera, the lens and gear for controlled camera movement. Here are a few considerations.
1. The Camera
- Should you use a DSLR or a mirrorless camera? My answer is straightforward: mirrorless. DSLRs are a viable alternative for stills as they can have beautiful, optical viewfinders that make working with them a pleasure. However for video that is a pointless feature that only makes the camera body bulkier and heavier. Is that an issue? Once you want to put that camera on a gimbal it is.
- Mirrorless camera systems have lots of video features that most DSLRs lack: their touch screens are great for using AF with video and assist features like zebras or focus peaking make life a lot easier for videographers.
- Should you go for a full frame camera, an APS-C (cropped) sensor or a Micro Four Thirds system? There is no simple answer to this question. I’d suggest that you keep in mind two facts. First, the larger the sensor, the better that camera will typically be in low light and at higher ISO settings. Is that a priority for you? Second, the larger the sensor, the physically heavier and larger your lenses will tend to be. The combined weight of the camera and the lens is something to think about when it comes to handheld or gimbal work.
- Do you need a 4K capable camera? It’s 2021, so the answer is yes. Not necessarily for delivery, at least not yet. Most of your clients will not be watching your videos on 4K devices. But they might. And should you need to zoom into your footage, crop it or stabilise it, shooting 4K for HD delivery allows you to do that.
- Do you need slow-motion capabilities? I would argue that you don’t or at least that this feature is not a priority for real estate videos. Slow-motion is about dramatic emphasis (think about sports or action movies). On a real estate shoot you determine the speed of your takes — you can pan or walk with the camera as fast or as slow as you want.
2. The Lens
Real estate videos typically use wide angle shots. That either means a wide angle prime (or primes) or a wide angle zoom lens. The pros and cons of each can be listed but you most certainly want a lens that is very sharp and has at least f/2.8 as its maximum aperture.
The focal length of the wide angle lens will depend on the sensor size of the camera that you are using. Field-of-veiw (FOV) is measured in degrees and is a most useful number to understand just how wide your lens is. It describes the angle that the given lens “sees” horizontally, vertically and diagonally.
The horizontal angle is an excellent way to think about your lenses. Wide angle lenses used for real estate videos typically have a horizontal FOV between 105 and 74 degrees. For a full frame camera that means somewhere between 14mm and 24mm. For a Micro Four Thirds camera the equivalent is around 7mm to 12mm and for an APS-C sensor about 9mm to 16mm.
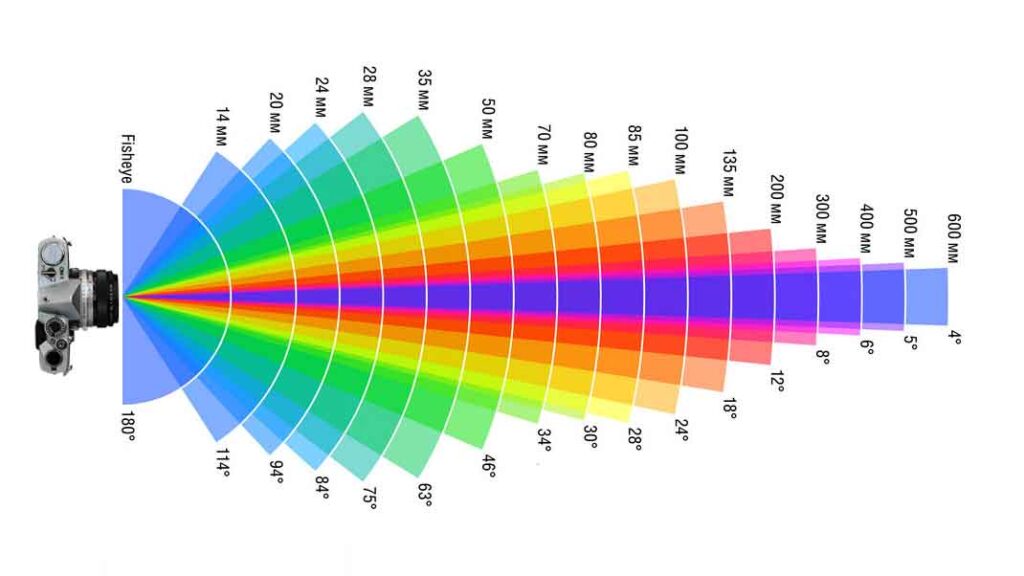
Focal length and horizontal field-of-view for cameras with a full frame sensor.
3. Filters
Two filters are incredibly useful for real estate videos: neutral density (ND) filters and polarising filters.
Neutral density filters are ‘sunglasses’ for your lenses. You would typically employ them to limit the amount of light reaching your camera’s sensor in order to use a large aperture for shallow depth-of-field with exterior shots.
Polarising filters are used for eliminating or enhancing reflections. It’s important to keep in mind that what they do cannot be simulated in post-production. In my opinion the polariser is a must have for real estate and will allow you to work creatively with all kinds of reflecting surfaces: glass, metal, marble, wood or water.
4. Moving the Camera – gimbals, tripods, sliders, Drones
The most popular tool for controlling camera movement is a gimbal. Gimbals have revolutionised low-budget filmmaking in the past few years. With a bit of practise they allow for perfectly controlled, smooth and stabilised camera moves in any direction. To put it bluntly: having a gimbal and learning to use it is a must for all real estate videographers.

Operating your gimbal like this will cause pain and lead to back injury! Please be safe and take care of your body and learn how to move with a gimbal!
Once the main tool for any filmmaker, tripods are somewhat under-appreciated today. Pans and tilts can be performed with gimbals – although a good, fluid head tripod will still produce smoother pans and tilts than a not very good and well-operated gimbal. Gimbals can also produce locked-off, still shots. I would nevertheless still encourage realtors and shooters working on their own to have a good tripod on standby.
Sliders have been basically made obsolete by gimbals. There is nothing you can do with a slider that you wouldn’t be able to do on a gimbal. And do it a lot faster.
Drones are great tools for showing properties in their larger context, i.e. the neighbourhood they are located in.
camera settings
Never think about any of your settings in terms of “these are the settings one must use for real estate videos.” That’s nonsense. Think about your creative and technical priorities. It’s those that will impact your technical decisions.
- Resolution: as mentioned before, you’re likely to prefer shooting in 4K even if it makes your post-production workflow technically a bit more demanding.
- Frame rate: depending on the country you’re located in, you’re most likely to shoot at standard frame rates of 25 or 30 fps. You’re welcome to shoot at 24 fps but please don’t think that it’s the frame rate that will make your footage look “cinematic”. It isn’t.
- ISO: you most definitely want to avoid shooting at high ISO settings. But the exact number will depend on your camera. You should try to use your lowest ISO values (definitely no more than 400) with a smartphone or a GoPro. But a modern mirrorless system capable of shooting in LOG mode will produce perfect results at ISO 800 (which might be the default for that mode anyhow).
- Aperture: real estate videos typically require images with large depth-of-field (DOF). But DOF depends not only on aperture! It also depends on subject distance and will be influenced by the field-of-view of the lens. That means that you do not need to shoot at f/11 or f/16 to produce images with large DOF. In a darker room you might get away even with f/2.8. However, to avoid producing soft images, try to shoot around medium-sized apertures around f/5.6.
- White balance: to get the best results use a grey card for reference in each room. That will allow you to get your white balance write in post for all your shots very fast. If you do not have the time to shoot a grey card, set your camera at the colour temperature that is closest to the dominant light source. Do not use AWB as that will result in fluctuating and inconsistent colour rendition as you walk through the property.
- Auto-focus: if you have a good camera with a fast lens, using AF combined with object tracking will produce excellent results most of the time. Keep in mind that you are creating relatively large DOF images with a typically very wide angle lens. That means that you’re pretty safe using AF. Nevertheless, watch your footage very critically for focusing errors (e.g. the lens losing it’s target and ‘hunting around’) as those cannot be corrected in post. If focus is off, reshoot the take.
creative tips for shooting real estate
1. Camera Placement
Camera placement should typically be between eye level and waist level. On a virtual tour the camera represents the viewer’s point-of-view so you should typically avoid placing the camera very low or very high.
As much as possible keep the camera level to avoid the strong perspective distortion that happens with wide-angle lenses being pointed up or down.
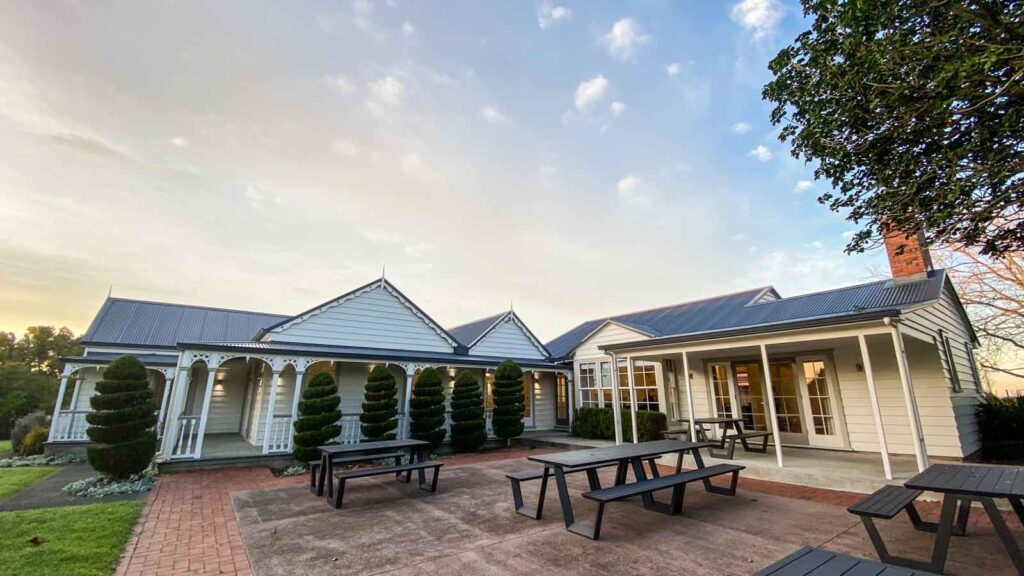
Wide-angle lenses can introduce extreme perspective distortion. Combined with camera movement the effect is dizzying.
Keep your verticals vertical.
2. Camera movement types
With regards to camera movement keep in mind two variables.
First, the pace of the movement. You might know the property, but your potential buyer will see it for the first time. Give the eye plenty of time to observe details. If you’re panning or tilting the camera: move slowly, so that objects would not suffer from motion blur as a result of the movement. If you’re moving forward: do not rush! As a generic rule of thumb moving just a bit slower is always preferable.
Second, always think about the purpose and the direction of the movement. The way I like to put it is: move with a purpose! Try to keep your movements simple. As you move from A to B imagine a single line connecting you: it can be a straight line or perhaps a gentle curve. The camera can look forward or perhaps towards the centre of the room.
Avoid sudden jerky motion and unmotivated camera moves. Keep in mind that the reason you’re moving is to describe a give 3D space. If your movements lead to spatial disorientation or confusion, you will ‘lose’ your audience. And that might mean losing the sale.
The nicest camera movements will tend to be simple: pushing in while moving forward with the camera pointing ahead, a slow sideways tracking shot or a drone flying towards or away from a property with a straight ascending or descending trajectory.
If you have the time, I recommend doing your pans and tilts in both directions: left to right and right to left, up-down and down-up. Why? Because once you’re set up it doesn’t take very long but will give you options in the edit!
3. Lighting – working with natural, available light
Lighting is a critical creative point for real estate videos.
Unless you have lots of time and/or assistants at your disposal, you can basically forget about using your own lights. At most, you might be able to supplement the ambient light with a small, portable light source of your own. What you must keep in mind, however, is that lighting is about illuminating a given volume of space and the larger the space the more light you’ll need.
That means that you’ll be dependent on available light both for your exterior and your interior shots. For real estate videos the biggest, ever present source of headaches is the almost constant presence of high to extreme contrast. A real estate video will always need to balance the amount of light present in the exterior with the level of illumination in the interior. Difficult as it is, there are a number solutions to this problem.
- You can try to shoot at a time of day when these two levels of illumination are closer to each other. It might mean working around the golden hour or at dusk. As the light is dimmer outside, turning on indoor lighting might mean that you won’t need to face the technical problems associated with over- and underexposure.
- Having to work with high contrast, high dynamic range scenes is the main reason for shooting in LOG mode with any camera that’s capable of that. LOG footage does two things: it compresses the highlights (thereby ‘saving’ them) and lifts the shadows (providing more detail in the dark areas while keeping them as noise-free as possible). Again, allow me to be blunt: for real estate videos that constantly need to work with extreme contrast ratios the ability to shoot in LOG is a blessing not even in disguise.
- From time to time, however, you will need to or you may choose to sacrifice highlights at the expense of preserving detail in the shadows and the mid-tones.
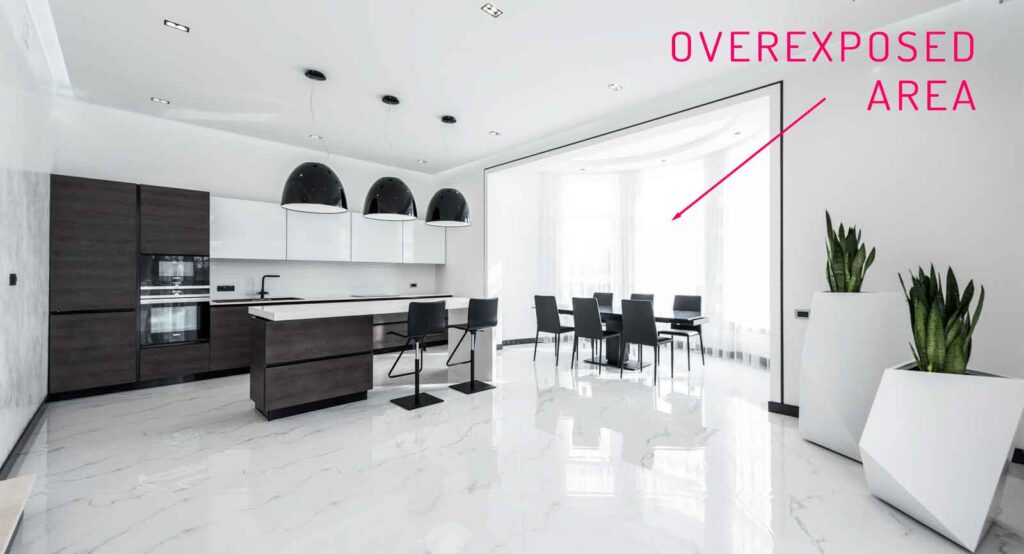
The world behind the window is completely overexposed. In cases like this it’s the correct creative decision to make.
An unattractive exterior could be detrimental to the shot.
4. white balance – using artificial lights
Also think about exterior v. interior light sources in terms of colour temperature and white balance.
Relative to each other, daylight contains more blue than a traditional tungsten or halogen light source. From the opposite perspective, the latter contain more red and orange.
With modern LED fixtures you can have similar differences between ‘cool’ white and ‘warm’ white LED lights. Not to mention fluorescent light sources (including many energy saving bulbs) that can possess the same differences and can add a green or magenta colour cast to the mix.
Think about these colour differences and try to use them to your advantage. A blue – orange colour contrast can often be very pleasing to the eye. So, before you start shooting have a look: does the room in question look better with its lights turned off or on?
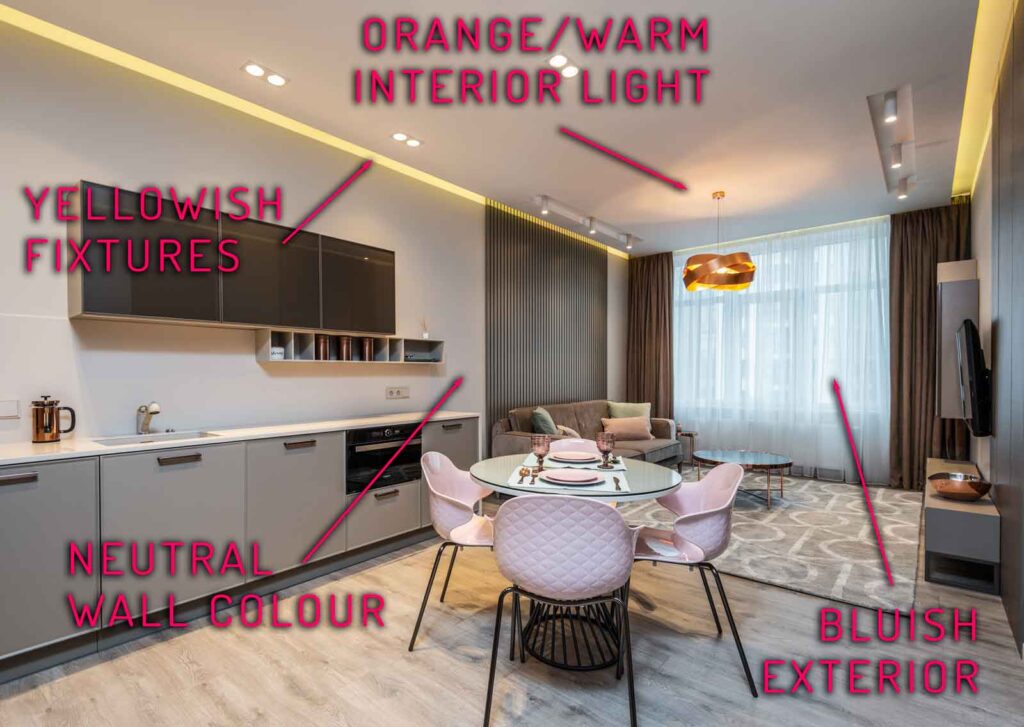
Colour temperature differences make recording images with accurate colour technically difficult.
The resulting colour contrast, however, can be visually attractive and lend depth to an image.
Editing your videos
The purpose of lot of what I’ve discussed above is to make your post-production and editing process as efficient and streamlined as possible. Preparing for your shoot, planning ahead and being very disciplined about the shoots you create allows you to produce the least amount of footage. And that will drastically speed up the editing process.
Editing is about establishing the pace and the rhythm of the video.
To be able to do that you need footage that is diverse in nature. If you returned to the editing suite with only a single, 15-minute gimbal shot of you walking through the property, you wouldn’t be able to edit a well-paced, pleasing 3-minute video of it. The camera would keep constantly moving, looking left and right without resting and giving you editing points. A diverse pool of varied shots, some static, some panning horizontally, some moving forward, some moving sideways will give you the options that you need for controlling the rhythm of your video. Don’t worry if you don’t get it right when you start producing real estate videos. Doing the editing will inform your next shoot. Once you’ve shot 10 videos you will know the kinds of shots that you need and your workflow will become a lot more efficient.
Always try to look at your footage and the edited version with fresh eyes. Are there edits that “jump”? Is the beginning and the end of your take clean, uncluttered?
Think about your soundtrack. Will you be using music? If yes, research stock sites to be able use music that is licensed.
Whichever editing platform you decide to use, think about media assets that you will need for all your projects. These might include logos, fonts, titles, YouTube album covers — assets that are always part of your branding and will help your clients identify your videos.
Plan ahead for different versions of your final edit. Will you be authoring just a 16:9 HD video or do you also need a vertical version for Facebook or Instagram stories and reels? All editing software will allow you to achieve this.
A very generic and good rule is that shorter is almost always better. Your clients are more likely to watch a 3-minute video than a 15-minute one.
Do you need training or advice in real estate videography?
I haven’t mentioned one aspect of real estate marketing videos: education. I hope that what you’ve read here answers some of the questions you had before you started reading.
If you’d like to learn more, I’m here for you. I will do my best to help you achieve your real estate videography goals. For certain topics a few hours of online consultations is incredibly efficient even without a pandemic — especially if we are not in the same city.
We can also do short, regular (weekly, monthly) mentoring sessions. And, of course, we can organise an in-person field day of shooting together. If you have any questions or comments please do not hesitate to write or call any time!


