
Creating Slideshows in Adobe Lightroom
- György
- March 23, 2021
- Photography, Software
How to turn an endless Photo gallery into a visually engaging story?
The Slideshow module is probably a feature of Adobe Lightroom that you have never given much thought to. It sits next to the Map and the Book modules and either seems a bit too complicated or simply useless.
Far from it. It’s a simple tool that will turn your selected collection into a slideshow video file that you can then share with anyone on social media or privately.
Two examples of slideshows I’ve created in Adobe Lightroom.
the problem: too many photos you never look at
Here is the problem: any event you go to, any trip you return from, every party, every safari, every cruise, every wedding you end up with hundreds or thousands of images.
Selection is painful and unless you actually enjoy editing your images it is highly likely that once you’ve imported your photos into Adobe Lightroom (or Capture One or into a sub-sub-subfolder somewhere on your hard drive), you will never again look at them!
Not only will you not look at them, but neither will your family or friends see them. Ever. They’ll keep bugging your for a few weeks but eventually, even the most persevering auntie will give up. And that is a shame.
the Solution: Turn your collections and albums into short, engaging slideshows
Creating a slideshow has two advantages.
First, the process will force you to cull your images and select the two or three dozen best photos. Don’t underestimate what an enormous and important part of the creative process this is. Selection is everything. A wedding, a birthday party, a camping trip doesn’t need to be told in 1600 images if 30 or 40 will do the job just fine. By reducing the number of your photos to the bare minimum, you will realise which moments are truly important for your story.
Don’t fall in love with your own photography. Be critical. Don’t feel sorry for the moments that don’t make it to the final selection. You can and will still keep them. But generally speaking, the shorter your slideshow will be, the more likely it is that your audience will actually watch it.
And that takes us to the second advantage. Sharing your photography. All photographers struggle with the fact that people don’t really look at photos any more. A seasoned Instagram or Facebook user will swipe through images of yours in under a second.
A 3-minute slideshow video is, on the other hand, something that people will look at. Watching it on a large TV screen a slideshow is also a great way of looking at photographer together! Your friends cannot gather around a phone or even a laptop screen to share the experience at the same time.
Dim the lights in your living room, turn on your 55-inch TV and, just like with a classical slide projector, enjoy the show!
Watch the step-by-step tutorial
The video below is the step-by-step guide to creating a slideshow in Lightroom and adding beginning and end titles to it in Photoshop. (If you watch it on Youtube, the description allows you to jump ahead to specific parts of the video.)
In case you'd like a quick written summary
Let me quickly describe how to create a Slideshow in Lightroom Classic.
Select the photos. I like to organise photos into a Collection – it makes it so much easier to find them again.
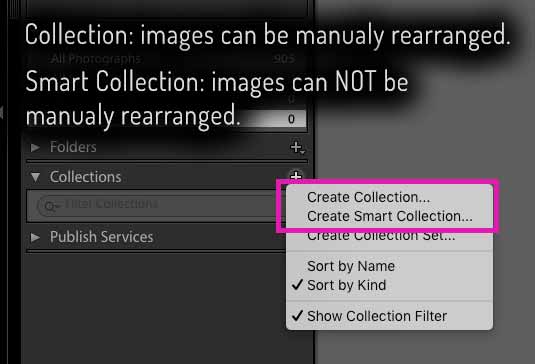
Here is an important tip: for your Slideshows create a standard Collection, i.e. not a Smart Collection. Why? Because a Smart Collection will not allow you to rearrange your photos manually! In a “dumb” Collection, on the other hand, you can re-order photos by dragging and dropping them in place.
Once you’re happy with the selection check your Slideshow settings on the right-hand panel. They really are self-explanatory. For the simplest (nicest) Slideshow just do the following:
Options tab: leave everything unchecked.
Layout tab: leave everything unchecked.
Overlays tab: leave everything unchecked.
Backdrop tab: leave everything unchecked just select the Background Colour of your choice. For me that’s almost always black.
Titles tab: I create Titles (if I need them) in Photoshop – it’s all explained in the video above. However if you want really nothing fancy, you can also create a simple beginning and end title in the Intro / Ending Screen section.
Music tab: This is crucial. Find a song or songs that have the duration you want. I usually recommend 5-7 seconds per image for a slow-paced slideshow, 3-4 seconds per image for a fast-paced one. Add the song by pressing the ‘+’ sign and then select them on your hard drive.
Playback tab: I recommend using the Automatic Slideshow Mode. The way it works is that you first need to select the length of the Crossfade (the transition between two slides). Experiment with it, but something between 1.5 and 2.5 seconds usually works well. Second, push the ‘Fit To Music’ button. This will adjust the duration of each slide so that your slideshow video would match to the length of the soundtrack.
Hit ‘Play’ or ‘Preview’ to see if your Slideshow works well. Once you’re satisfied, click on ‘Export Video‘. I recommend exporting your video as a 1080p file. That will produce a 1920 x 1080 pixel large video frame (and place your photos inside it without any cropping) – this is the standard called these days Full HD.
And no, as of now, Adobe Lightroom is not capable of exporting a 4K Slideshow.
Once your mp4 video file is ready, you can share it online using your service of choice. It’s also worth keeping in mind that both Vimeo and Youtube allow you to password protect your files and keep them private.


